


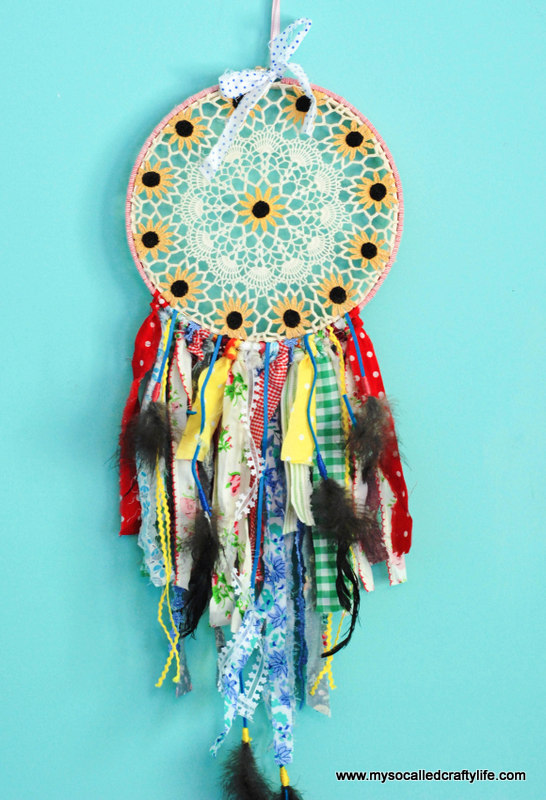
 Two weeks ago this past Saturday we lost our favorite rooster Mabock. He was a beautiful black silkie rooster, and the sweetest we have ever had! Somehow the side door of the coop was not properly closed and the girls were able to get out and free range in the yard when no one was home. We came back and found that Auntie Mame had been attacked by an animal we think was a coyote, and Mabock was missing. We found the little guy a little bit down from the road the next day. Judging by the feathers and tracks in the yard, we think he saw Mame being attacked and came to her defense. He saved her life, but was attacked himself and died. My dad buried him near the coop so he can always watch over his girls, and delivered a sweet little eulogy. He was our favorite bird that we’ve ever had, and he will be missed by all of us! You never really think you can get so attached to a chicken, but they wiggle their way into your hearts! I was able to recover some of Mabock’s feathers from around the yard and decided to clean them and make a dream catcher. I used to make these when I was little the traditional way. I recently saw a dream catcher made from a doily and embroidery hoop on Pinterest Here and Here, and I thought I’d like to try one of my own. You can find tutorials all over the internet for making your own dream catcher. Here is how I made mine:
Here’s What You Need:
*Doily
*Embroidery Hoop to Fit your Doily
*Yarn, Ribbon, Trims
*Fabric Scraps (Various Lengths, smallest being at least 10″ long)
*Leather Lacing
*Embroidery Floss
*Feathers
*Double Stick Tape
*Scissors
Instructions:


The first thing you need to do is cover your outer hoop piece in your yarn or ribbon. Tie your end of yarn to the hoop where it begins at the top. Wrap the yarn around the hoop. Keep wrapping all the way around the hoop until you get to the other end where the wood stops. Tie the end off and snip off excess.

Cut various lengths of fabric strips, ribbon, and trims. I believe my longest piece was about 26″ long and my smallest piece was around 10″ long. Take a piece of trim or fabric and loop it through the bottom of the hoop and match the ends of the piece together so they are even. Now, hold the fabric close to the bottom where the hoop is and loop the fabric ends through making a knot up against the hoop. So you will have a knot at the bottom side of the hoop and two tails of fabric coming down from your knotted strip.

Continue adding fabric strips and trim pieces until you have a nice amount on the bottom of your hoop.

Cut a long piece of leather lacing to tie in the middle of the strips and two medium lengths and two small lengths as well. Tie a couple of feathers to the ends of your leather lacing with embroidery floss. Wrap the floss around the feather top several times to cover the ends. Tie off the thread, knot well, and trim excess thread. Add the leather strips with the feathers to the bottom section of the hoop with all the fringe. Place them where you like. I made my long one in the center, the medium ones midway through on each side, and the shortest near the ends.


Next, run some double stick tape around the outside rim of the inside hoop. Stretch and smoosh the doily over the hoop securing the edges on the tape. The tape will help hold the doily on the hoop so you can sandwich it inside the outer hoop. If your doily is larger than your hoop, you don’t need to worry about taping it. Once your doily is secure, place the outer hoop over the inner hoop and fit together, adjusting the screw at the top as necessary. Once your hoop is put together you can finish it off by stringing some ribbon to the top for hanging.


I LOVE my funky little hoop! It looks really cute in my craft room. Every time I see it I will think of my favorite fluffy little man. So not only is it cute, it’s also special! You can totally customize this little hoop to your liking and really make it your own. I hope some of you guys will give this one a try, you’ll have so much fun! It’s a great project for the kiddos too! I’ll be back next week with another fun DIY. Until then…
Happy Crafting!


CraftCrave | DigiFree | CraftCrave
[…] Shabby Vintage Doily DIY Dream Catcher – 1 freebie(s)? […]